Wood Siding Guide: Installation, Repair, Maintenance, and Costs
Whether you want to know what is wood siding or need guidance on how to install wood siding, this comprehensive resource from Extollo Construction covers everything homeowners should understand. From exploring how long does wood siding last to learning how to clean wood siding and how much is wood siding, we address each aspect thoroughly. Additionally, you will find expert advice on how to repair wood siding and how to replace wood siding on a house, ensuring your exterior maintains its beauty and structural integrity for decades.
What Is Wood Siding?
Understanding Wood Siding Construction
So what is wood siding exactly? It refers to exterior cladding crafted from lumber planks, boards, or shingles that protect a home's structural walls from weather elements. For centuries, builders have relied on this traditional material because it offers exceptional durability and timeless appeal. The construction involves attaching individual pieces horizontally, vertically, or in overlapping patterns to create a continuous protective barrier against wind and temperature fluctuations.
Types of Wood Siding
Homeowners can select from numerous styles, each offering distinct visual characteristics and requirements. Understanding these options helps you choose the profile that best complements your home's architecture.
Common Wood Siding Styles:
Clapboard features horizontal overlapping boards with a tapered profile, creating the quintessential look for Colonial and traditional homes with its clean, layered appearance.
Shiplap uses flat boards with rabbet joints that fit together to create a flush surface, making it ideal for modern farmhouse aesthetics with its smooth, contemporary lines.
Board and Batten consists of vertical boards with narrow strips covering the seams, working beautifully for both rustic and contemporary designs that benefit from vertical emphasis.
Cedar Shakes are hand-split textured pieces that provide natural, irregular beauty perfect for cottage and craftsman styles seeking authentic, organic character.
Shingles are machine-cut uniform pieces that deliver consistent appearance and durability, defining Cape Cod architecture with their classic coastal charm.
Lap Siding utilizes beveled horizontal planks that overlap to shed water effectively, creating the timeless look of classic American exteriors across various architectural periods.
Each style requires specific techniques, and your choice affects both labor costs and long-term maintenance needs.
Wood Species Used for Siding
Cedar remains the most popular choice due to its natural rot resistance and dimensional stability. Redwood offers similar durability with a distinctive reddish hue, though it commands premium pricing. Pine provides an economical option but requires more protective finishing. Cypress excels in humid climates because of its exceptional moisture resistance. Select your species based on regional climate conditions and your willingness to commit to ongoing maintenance.
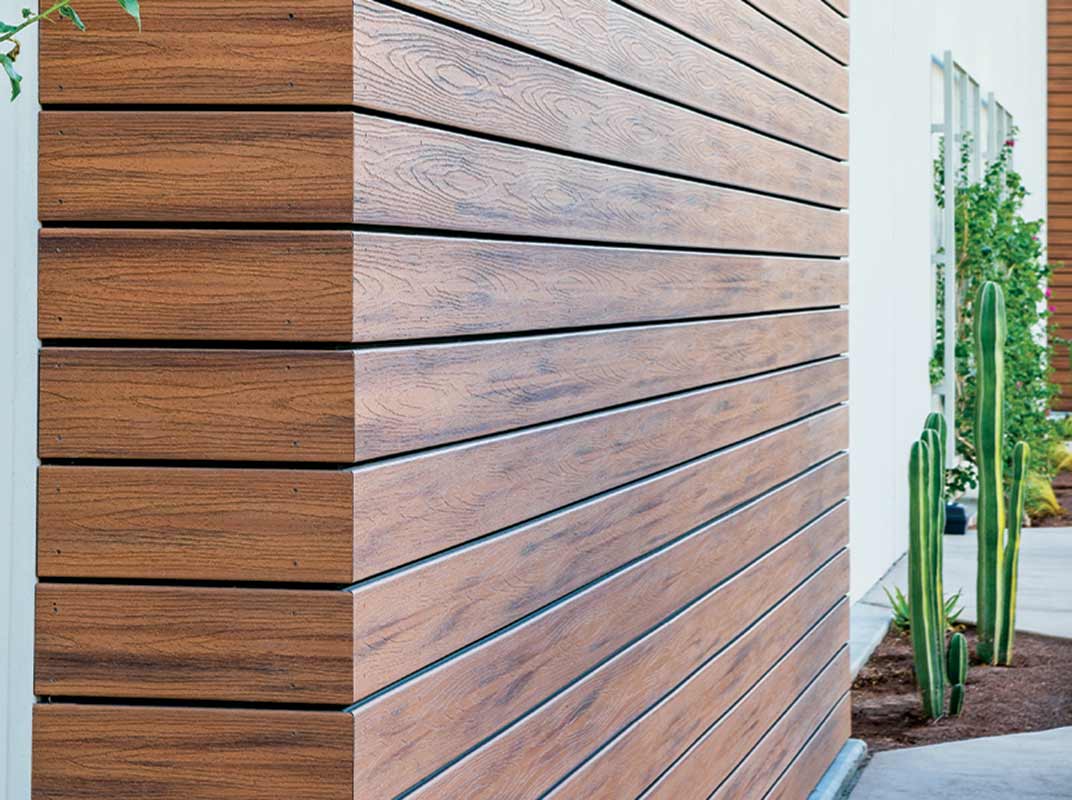
What Is Engineered Wood Siding?
So what is engineered wood siding? It consists of fibers, strands, or particles bonded together with resins and waxes under heat and pressure. Manufacturers treat these products with zinc borate for enhanced pest and rot resistance. Fiber cement alternatives combine fibers with Portland cement for added durability. These manufactured options deliver consistent quality and often carry longer warranties while mimicking authentic grain textures.
Wood Siding vs Other Materials
Natural lumber provides warmth and authenticity that vinyl and metal simply cannot replicate. However, vinyl requires less maintenance and costs less initially. Fiber cement offers superior fire resistance and stability but lacks lumber's insulating properties. Metal resists pests and rot yet may dent and shows scratches easily. Your decision should balance aesthetic preferences, maintenance commitment, budget constraints, and climate considerations.
Benefits and Considerations of Wood Siding
Natural Beauty and Aesthetic Appeal
This material delivers unmatched visual warmth through its grain patterns, texture variations, and organic character. It complements virtually any architectural style, from historic Victorians to contemporary minimalist designs. Furthermore, lumber ages gracefully, developing a distinguished patina that many homeowners find increasingly attractive over time.
Environmental Benefits of Wood
As a renewable resource, lumber offers significant environmental advantages over petroleum-based or energy-intensive alternatives. Trees absorb carbon dioxide during growth, and that carbon remains sequestered within the exterior cladding throughout its lifespan. Responsibly sourced materials from certified sustainable forests minimize ecological impact. Additionally, these products require less energy to manufacture than vinyl, aluminum, or fiber cement.
Customization and Finishing Options
Wood siding accepts stains, paints, and clear sealers, allowing virtually unlimited color and finish possibilities. You can choose opaque paints for uniform coverage or semi-transparent stains that reveal natural grain patterns. Some homeowners prefer allowing cedar or redwood to weather naturally to a silvery-gray patina. Extollo Construction can help you explore these options, and this versatility enables you to update your home's appearance without replacing the siding itself.
Maintenance Requirements
Lumber exteriors demand consistent attention to maintain their protective qualities and appearance. Expect to inspect your cladding annually, clean it periodically, and refinish it every three to seven years depending on your climate and finish type. Promptly addressing minor issues prevents costly major repairs. While maintenance requires time and investment, many homeowners consider this a worthwhile trade-off for the aesthetic benefits.
Cost Considerations
How much is wood siding compared to alternatives? Initial material and labor costs typically exceed vinyl but remain comparable to fiber cement. However, the total cost of ownership depends heavily on your maintenance commitment and chosen species. Premium options like cedar and redwood cost more upfront but often prove more economical long-term due to superior durability and longer intervals between refinishing.
How Long Does Wood Siding Last?
Expected Lifespan by Wood Type
Understanding how long does wood siding last helps you plan for future expenses and make informed material selections. Cedar typically lasts 20-40 years with proper maintenance, while redwood can exceed 30 years. Pine generally performs well for 15-20 years when adequately protected. Cypress may last 25-35 years in appropriate climates. These ranges assume regular maintenance and proper setup.
Factors That Affect Wood Siding Longevity
Multiple variables influence your exterior cladding's actual lifespan beyond the species selection. Regional climate plays a significant role, as excessive wetness, intense sun exposure, and temperature extremes accelerate deterioration.
Key Factors Affecting Durability:
Climate conditions including humidity, rainfall, and UV exposure
Quality of initial setup and fastening methods
Maintenance frequency and thoroughness
Finish type and reapplication schedule
Proper ventilation behind panels
Ground clearance and drainage around foundation
Addressing these factors proactively extends your cladding's functional life significantly beyond minimum expectations.
Engineered Wood Siding Durability
Engineered products often outperform lumber in stability and consistency. Many manufacturers offer 30-50 year warranties against rot, delamination, and insect issues. These products resist warping and swelling better than solid lumber because their manufacturing process eliminates inherent weaknesses. However, once compromised, engineered materials typically require full board replacement rather than spot repairs.
Signs Wood Siding Needs Replacement
Several indicators suggest your exterior has reached the end of its serviceable life. Widespread rot affecting multiple boards signals systemic failure. Extensive warping that causes gaps in weather protection compromises your home's envelope. Deep cracking that penetrates through boards allows water infiltration. When paint or stain no longer adheres despite proper surface preparation, the substrate has likely deteriorated beyond repair.
Extending Wood Siding Lifespan
Proactive maintenance dramatically extends your exterior's useful life. Apply quality finishes before existing coatings fully fail. Maintain proper caulking around windows, doors, and trim joints. Keep vegetation trimmed away from surfaces to promote air circulation. Address minor issues promptly before water penetrates and causes rot. By following these simple practices—or partnering with Extollo Construction for regular upkeep—you can often add decades to your cladding's performance.
How Much Is Wood Siding?
Average Wood Siding Costs by Type
Material costs vary substantially based on species, grade, and style. Cedar lap options typically range from $5-$12 per square foot for materials alone. Redwood commands $8-$20 per square foot due to limited availability. Pine offers budget-friendly options at $3-$7 per square foot. Board and batten styles often cost more due to increased material requirements, while shingles and shakes fall mid-range.
Cedar vs Pine vs Redwood Pricing
Cedar provides the best balance of cost and performance for most applications, priced between premium redwood and economical pine. Redwood's scarcity and exceptional beauty justify its premium pricing for high-end projects. Pine's affordability makes it attractive for budget-conscious homeowners willing to commit to diligent maintenance. Consider total ownership costs rather than initial material prices when comparing these options.
Engineered Wood Siding Costs
Engineered products typically cost $3-$8 per square foot for materials, positioning them competitively against lumber options. Popular brands like LP SmartSide and similar products offer consistent pricing nationwide. While initial costs appear attractive, factor in that engineered products often require professional setup to maintain warranty coverage. Long-term value depends on your climate and maintenance preferences.
Installation Labor Costs
Professional work adds $3-$8 per square foot to your total project cost. Complex architectural features, multi-story homes, and difficult access conditions increase labor expenses. Most contractors complete average-sized homes within one to two weeks. Labor rates vary regionally, with metropolitan areas typically commanding higher prices than rural locations.
Factors That Affect Wood Siding Costs
Your final project cost depends on numerous variables beyond basic material and labor pricing. Understanding these factors helps you budget accurately and identify potential savings opportunities.
Cost Variables to Consider:
Grade selection (clear, select, or standard)
Total square footage requiring coverage
Architectural complexity and detail work
Existing cladding removal and disposal
Finish application (paint, stain, or sealer)
Necessary repairs to underlying sheathing
Obtaining detailed quotes from qualified contractors ensures you understand the full scope of expenses before committing to your project.
Long-Term Cost of Ownership
Annual maintenance expenses typically average 1-3% of initial costs. Plan for complete refinishing every 5-7 years, costing $1-$4 per square foot. Minor repairs may add $200-$500 annually depending on your exterior's condition and age. Despite these ongoing costs, well-maintained lumber cladding delivers exceptional value through enhanced curb appeal, energy efficiency, and lasting durability.
How to Install Wood Siding
Planning and Preparation
Successful projects begin with accurate measurements and thorough planning. Calculate square footage including waste allowance of 10-15%. Select appropriate materials based on your design preferences and budget. Prepare the surface by ensuring sheathing is sound, level, and properly fastened. Allow lumber to acclimate on-site for several days before beginning work.
Required Tools and Materials
Learning how to install wood siding requires assembling proper equipment. Essential tools include a circular saw, miter saw, pneumatic nail gun, level, chalk line, measuring tape, and safety gear. Materials include house wrap, flashing, stainless steel nails, caulk, primer, and finish coatings. Using quality tools and materials ensures professional results and prevents premature failures—something Extollo Construction prioritizes on every project.
Step-by-Step Installation Process
Begin by placing weather-resistant barrier over sheathing, overlapping seams properly. Attach starter strips at the foundation to establish proper angle for the first course. Nail boards at specified intervals, maintaining consistent overlap. Work from bottom to top, checking level frequently. Stagger end joints between courses and maintain appropriate spacing at corners and trim.
Proper Nailing and Fastening Techniques
Use stainless steel or hot-dipped galvanized nails sized appropriately for your cladding thickness. Position nails 1 inch from board edges to prevent splitting. Drive nails snug but avoid overdriving, which causes dimpling and finish failure. For lap profiles, nail through the thick portion above the overlap, allowing boards to expand and contract without buckling.
Corner Treatments and Trim Work
Inside corners require careful fitting of board ends against vertical corner pieces. Outside corners typically use overlapping corner boards or mitered joints. Window and door trim should be mounted before cladding, with proper flashing behind top and side casings. Maintain consistent reveals around all openings and ensure trim is level and plumb before proceeding with adjacent boards.
Flashing and Moisture Protection
Proper flashing prevents water infiltration that causes premature rot and structural harm. Place step flashing where cladding meets rooflines. Apply head flashing above all windows and doors, extending behind weather barrier. Use kick-out flashing where roof edges meet walls. Caulk all joints where boards meet trim, ensuring continuous weather protection throughout the project.
DIY vs Professional Installation
While experienced DIYers can successfully complete this work, the project demands significant skill and time investment. Improper setup voids warranties and creates water problems that cause premature failure. Professional crews ensure proper flashing, fastening, and finishing that protect your investment for decades. Most homeowners benefit from hiring experts for this type of exterior project.
How to Replace Wood Siding on a House
Assessing Damage and Planning Replacement
Before learning how to replace wood siding on a house, thoroughly evaluate the extent of deterioration. Probe suspected areas with an awl to detect hidden rot. Inspect sheathing and framing behind affected sections for water problems. Document all problem areas to determine whether spot repairs, partial replacement, or complete residing makes financial sense.
How to Replace Wood Siding: Step-by-Step
Understanding how to replace wood siding begins with careful removal of compromised boards. Cut nails with a reciprocating saw or slide a pry bar under boards to lift them free. Inspect and repair underlying components as needed. Cut replacement boards to length, allowing appropriate gaps for expansion. Nail new pieces following original patterns and apply matching finish.
Matching Existing Siding
Finding compatible replacement materials requires careful attention to profile dimensions, species, and weathering characteristics. Bring a sample piece to lumber suppliers for accurate matching. Consider that new lumber will appear different until it weathers, though staining can help blend mismatched sections. For older homes, salvage yards sometimes stock matching vintage profiles.
Partial vs Complete Siding Replacement
Partial replacement makes sense when deterioration affects isolated areas and matching materials remain available. Complete replacement becomes cost-effective when repairs would exceed 30-40% of residing costs or when matching proves impossible. Additionally, if underlying water problems have caused widespread hidden harm, full replacement allows thorough inspection and correction of systemic issues.
Can You Put Vinyl Siding Over Wood Siding?
Yes, you can install vinyl siding over wood siding with proper preparation. Existing lumber must be sound, flat, and securely attached. Address any rot or water issues first. Place furring strips over uneven surfaces to create a flat nailing base. However, this approach adds weight, may trap wetness, and can mask underlying problems. Removal typically proves preferable for long-term results.
How to Repair Wood Siding
Common Wood Siding Damage Types
Exterior cladding suffers from several common problems requiring repair. Rot develops where wetness accumulates, particularly near ground level and around openings. Cracks and splits result from drying and weathering cycles. Holes appear from impact or fastener failures. Insect activity, especially from termites and carpenter ants, creates tunnels and weakened areas requiring attention.
How Do You Repair Old Wood Siding?
When addressing how do you repair old wood siding, start by cleaning and inspecting thoroughly. Remove loose paint and deteriorated fibers with scrapers and wire brushes. Stabilize soft, punky areas with consolidating products that penetrate and harden compromised fibers. Fill voids with appropriate fillers or epoxy compounds. Prime and finish repaired areas to match surrounding surfaces.
How Do You Repair Exterior Wood Siding?
Understanding how do you repair exterior wood siding requires assessing severity and type. Minor surface issues respond well to filling and refinishing. Deeper problems may require partial board replacement. Rot repair involves removing all deteriorated material before rebuilding with epoxy or placing new lumber. Always identify and correct water sources causing the problem before completing repairs.
How to Repair Wood Siding on a House: Specific Techniques
Learning how to repair wood siding on a house involves mastering several techniques. For cracks, clean debris and apply flexible filler, sanding smooth after curing. For loose boards, renail using longer fasteners into solid framing. For small rot spots, excavate deteriorated material, apply hardener, then fill with epoxy filler. Match existing finish after repairs cure completely.
Repairing Rotted Wood Siding
Minor rot responds to treatment with consolidants that strengthen remaining fibers. Apply these products liberally, allowing full penetration before they cure. Fill resulting cavities with two-part epoxy fillers designed for exterior use. For extensive rot, cut out affected sections and splice in new lumber, ensuring cuts occur over solid backing for proper nailing.
Fixing Cracks and Splits
Address cracks promptly before water infiltration causes rot. Clean debris from crack interiors using compressed air or thin tools. Apply exterior filler or caulk into cracks, forcing material deep into voids. For splits at board ends, apply waterproof glue and clamp or nail the split together. Seal all repairs with primer and topcoat to prevent water entry.
Addressing Insect Damage
Termite and carpenter ant activity requires professional pest treatment before repairs proceed. After eliminating infestations, assess structural integrity of affected areas. Remove extensively compromised lumber and replace with treated material. Minor tunneling can be filled with epoxy after ensuring active insects are eliminated. Implement preventive measures including barrier treatments and water control.
When Repair Is Sufficient vs Replacement Needed
Determining whether to repair or replace requires honest evaluation of deterioration extent and repair economics. Minor issues affecting limited areas typically warrant repair.
Indicators That Replacement Is Necessary:
Rot affects more than 20% of any individual board
Deterioration spans multiple adjacent courses
Matching materials are unavailable
Repeated repairs have weakened structural integrity
Underlying sheathing shows water problems
Extollo Construction provides professional assessments to help you make cost-effective decisions about your exterior's future.
How to Clean Wood Siding
Routine Cleaning Schedule
Knowing how to clean wood siding properly preserves both appearance and protective finishes. Plan thorough cleaning once or twice annually, typically in spring and fall. Address bird droppings, sap, and similar deposits promptly before they stain or compromise finishes. Regular cleaning removes dirt and organic matter that trap wetness against surfaces.
Gentle Cleaning Methods for Wood
Start with the least aggressive approach that achieves satisfactory results. Mix mild dish soap with water and apply using soft bristle brushes. Work from bottom to top to prevent dirty water from streaking clean surfaces. Rinse thoroughly with garden hose pressure, working top to bottom. Avoid abrasive scrubbing that harms fibers and finish surfaces.
Removing Mold, Mildew, and Algae
Mold and mildew thrive in shaded, moist environments and require specific treatment. Mix one part oxygen bleach with three parts water for effective, lumber-safe cleaning. Apply solution and allow it to work for 10-15 minutes before scrubbing. Rinse completely and allow the exterior to dry thoroughly. Avoid chlorine bleach, which harms fibers and nearby vegetation.
Pressure Washing Precautions
Pressure washing can harm exterior cladding if performed incorrectly. Use fan tips rather than concentrated streams, and maintain appropriate distance from surfaces. Keep pressure below 1,500 PSI for most applications. Never direct water upward under edges where it can penetrate behind boards. When uncertain, manual cleaning with brushes proves safer for lumber surfaces.
Cleaning Before Refinishing
Proper surface preparation ensures finish adhesion and longevity. Remove all loose paint, dirt, and mildew before applying new coatings. Allow lumber to dry completely—typically three to five days of dry weather—after wet cleaning. Lightly sand to promote mechanical adhesion and remove raised grain caused by cleaning. Address any repairs before proceeding with finish application.
Wood Siding Maintenance and Protection
Regular Inspection Schedule
Conduct comprehensive inspections every spring and fall, plus after severe weather events. Check caulking around windows, doors, and trim for gaps or failures. Examine areas near ground level where splash-back promotes exposure. Look for finish deterioration including fading, chalking, and peeling. Document concerns and address them promptly before minor issues escalate.
Painting and Staining Wood Siding
Quality finishes protect lumber from UV rays and biological growth. Apply premium exterior paints or stains according to manufacturer specifications. Expect to repaint every 5-10 years or restain every 3-5 years depending on exposure and product quality. Maintain consistent coating thickness and apply during appropriate weather conditions for optimal adhesion and durability.
Sealing and Weatherproofing
Inspect and maintain caulked joints annually, replacing deteriorated caulk before water penetrates. Use paintable exterior caulk compatible with your finish system. Pay particular attention to horizontal surfaces where water can pool. Ensure proper overlap at joints and maintain adequate clearance between cladding and roofing materials to prevent wicking.
Preventing Rot and Water Damage
Proper drainage prevents water accumulation that causes rot. Maintain gutters and downspouts to direct runoff away from exteriors. Ensure grade slopes away from foundations. Trim vegetation to allow air circulation and sunlight penetration. Verify that irrigation systems do not spray directly on surfaces. Address any water sources promptly to prevent rot development.
Pest Prevention and Treatment
Protect lumber exteriors from termites, carpenter ants, and beetles through preventive measures. Maintain clearance between soil and cladding edges. Eliminate ground contact that provides pest access. Schedule professional pest inspections annually. Apply borate treatments to vulnerable areas during repairs or refinishing. Address infestations immediately to prevent structural harm.
Seasonal Maintenance Tasks
Spring maintenance includes thorough cleaning, inspection, and addressing winter harm. Summer focuses on monitoring for pest activity and finish condition. Fall preparation involves clearing debris, checking drainage systems, and completing any needed repairs before winter. Winter maintenance primarily involves prompt snow removal where cladding contacts accumulating snow.
Finishing Options for Wood Siding
Paint vs Stain: Which Is Better?
Paint provides complete coverage and unlimited color options but requires more preparation for reapplication. Stain penetrates fibers rather than forming a surface film, making maintenance easier. Paint typically lasts longer between applications but fails more noticeably through peeling and cracking. Stain fades gradually and refinishes without extensive scraping and sanding.
Natural Weathering and Oil Finishes
Some homeowners prefer allowing lumber to weather to a silver-gray patina. This approach eliminates refinishing but still requires protective treatments to prevent water intrusion. Penetrating oil finishes maintain appearance while providing water repellency. These require more frequent reapplication—typically annually—but application is quick and simple.
Best Paint Types for Wood Siding
100% acrylic latex paints deliver excellent durability, flexibility, and color retention for exterior lumber applications. Oil-based primers provide superior penetration and adhesion on bare surfaces. Specialty exterior paints formulated for these substrates include additives that resist mildew growth and UV degradation. Select products specifically designed for exterior lumber rather than general-purpose paints.
Stain Options and Color Choices
Solid stains provide paint-like coverage while allowing some grain texture to show through. Semi-transparent stains offer moderate coverage that highlights grain patterns. Transparent stains provide minimal color while enhancing the lumber's appearance. Darker colors typically last longer than light tones, which absorb more UV radiation and fade faster. Extollo Construction can guide you toward the best stain choice for your home's style and exposure conditions.
Preparation for Finishing
Proper preparation determines finish performance regardless of product quality. Clean surfaces thoroughly and allow complete drying. Sand glossy areas to promote adhesion. Prime bare lumber with appropriate primer for your topcoat system. Fill cracks and complete repairs before finish application. Apply products during manufacturer-recommended temperature and humidity ranges.
Refinishing Schedule and Maintenance
Monitor finish condition annually and plan refinishing before complete failure occurs. Maintain finishes proactively rather than waiting for peeling or significant fading. Spot maintenance extends time between complete refinishing projects. Quality preparation and products during initial application reduce long-term maintenance frequency and costs.
Engineered Wood Siding vs Natural Wood
What Is Engineered Wood Siding Made Of?
Engineered exterior cladding combines strands, fibers, or particles with binding resins and wax under heat and pressure. Manufacturers treat products with zinc borate for pest and decay resistance. The process creates consistent, uniform panels without knots, grain variations, and content fluctuations. Various surface textures replicate grain appearances convincingly.
Durability and Maintenance Comparison
Engineered products resist rot, warping, and insect activity better than most lumber species. They maintain dimensional stability through temperature cycles that cause solid lumber to expand and contract. However, engineered options still require painting and maintenance. Cut edges and compromised areas need sealing to prevent water infiltration and swelling.
Cost Differences
Engineered options typically cost less than premium species like cedar and redwood. Initial savings may offset higher lumber costs depending on your maintenance commitment. Long-term expenses favor engineered products in challenging climates where solid lumber deteriorates quickly. However, lumber often allows spot repairs, while engineered products require full board replacement.
Aesthetic Considerations
Modern engineered products convincingly replicate grain and texture. However, repetitive patterns become apparent across large projects. Solid lumber provides unique character through genuine grain variations, knots, and organic imperfections. Painted applications minimize aesthetic differences, while clear or semi-transparent finishes favor authentic lumber's appearance.
Environmental Impact
Lumber from sustainably managed forests sequesters carbon and requires minimal manufacturing energy. Engineered products use waste materials but require significant energy for manufacturing. End-of-life disposal favors solid lumber, which biodegrades or burns cleanly, while engineered products' resin content complicates recycling and disposal options.
Common Wood Siding Problems and Solutions
Warping and Cupping
Warping results from uneven absorption between board faces. Wide boards warp more readily than narrow profiles. Proper acclimation before setup reduces initial warping. Finishing all board surfaces, including backs and ends, equalizes exchange and minimizes dimensional changes. Severely warped boards require replacement rather than repair.
Paint Peeling and Blistering
Water trapped beneath paint films causes peeling and blistering. Common sources include interior humidity escaping through walls and exterior water infiltration. Inadequate surface preparation prevents proper adhesion. Address underlying problems before refinishing. Scrape loose paint, sand edges smooth, prime bare areas, and apply quality topcoats.
Rot and Decay
Rot develops where lumber remains consistently moist. Common locations include ground-level boards, areas near leaking gutters, and joints with failed caulking. Prevention requires maintaining proper drainage, ventilation, and finish coatings. Early-stage rot responds to consolidant treatments, while advanced rot requires replacement. Always eliminate water sources before completing repairs.
Insect Infestation
Termites, carpenter ants, and boring beetles cause structural harm requiring professional intervention. Warning signs include sawdust accumulations, mud tubes, hollow-sounding boards, and visible exit holes. Treatment requires licensed pest control professionals. After treatment, repair compromised areas and implement preventive measures including barrier treatments and water management.
Splitting and Cracking
Lumber develops checks and cracks as it dries and ages. Minimize cracking through proper acclimation, appropriate fastening, and maintaining protective finishes. Address cracks promptly with flexible fillers before water penetration causes rot. End-grain sealing during setup significantly reduces board-end splitting. Accept minor surface checking as character.
Wood Siding Installation Styles
Horizontal Lap Siding
Traditional clapboard and beveled lap profiles create classic American exteriors through horizontal board placement with overlapping courses. Each board's lower edge projects beyond the course below, shedding water efficiently. This style suits most architectural designs and remains the most popular method. Exposure adjustments accommodate various aesthetic preferences. board's lower edge projects beyond the course below, shedding water efficiently. This style suits most architectural designs and remains the most popular wood siding installation method. Exposure adjustments accommodate various aesthetic preferences.
Board and Batten
This vertical style features wide boards with narrow battens covering joints between them. The dimensional contrast creates bold shadow lines and dramatic visual impact. Board and batten suits rustic, farmhouse, and contemporary designs equally well. Setup requires horizontal blocking for nail attachment and careful attention to water management behind vertical surfaces.
Cedar Shakes and Shingles
Shakes offer rustic texture through hand-split surfaces and irregular thickness. Shingles provide refined appearance through machine-cut precision. Both mount in overlapping courses similar to roofing applications. These styles excel on cottage, craftsman, and Cape Cod architectures. They require specialized techniques and appropriate underlayment for weather protection.
Tongue and Groove
Interlocking profiles create tight joints between adjacent boards without visible fasteners when blind-nailed. This style works for horizontal, vertical, or diagonal setups. Tongue and groove provides a refined, seamless appearance popular in contemporary and Scandinavian-inspired designs. Quality lumber selection ensures proper joint fit without excessive gaps or binding.
Professional Wood Siding Services
Why Choose Professional Installation
Professional installers bring expertise in water management, proper fastening techniques, and detail work that protects your investment. They understand best practices for maximum longevity and warranty protection. Professional crews complete projects efficiently with proper equipment and safety measures. Their work typically includes warranties covering both materials and labor.
Expert Wood Siding Repair Services
Skilled technicians assess deterioration thoroughly to recommend cost-effective solutions. They match existing profiles and finishes precisely for seamless repairs. Professionals identify underlying structural issues that homeowners often miss. Their repairs address root causes rather than just visible symptoms, preventing recurring problems and additional expenses.
Free Consultation and Estimate
Extollo Construction provides comprehensive on-site inspections at no cost. Our estimators evaluate current conditions, discuss your goals, and explain all available options. Detailed written estimates clearly itemize materials, labor, and project timelines. We answer questions thoroughly and provide references from satisfied customers in your area.
Complete Wood Siding Solutions
Our services span every aspect of exterior cladding ownership, from new projects to repairs, refinishing, and ongoing maintenance. We handle jobs of all sizes, whether you need a few boards replaced or complete residing. Our comprehensive approach ensures consistent quality and accountability throughout your project's duration.
Quality Materials and Craftsmanship
We source premium products from reputable suppliers who share our commitment to quality. Our craftsmen receive ongoing training in best practices and manufacturer specifications. We use proper fasteners, flashing, and sealants that ensure lasting performance. Every project receives careful supervision and thorough final inspection before completion.
Customer Testimonials and Portfolio
Our portfolio showcases diverse projects demonstrating our versatility and attention to detail. Previous clients consistently praise our communication, professionalism, and quality results. We invite prospective customers to view completed work and speak directly with homeowners about their experiences. Your satisfaction drives our reputation and future success.